
So I saw some examples of book folding (from someone selling some books) a while ago and I love the idea so much that I wanted to try it myself. I have clicked on numerous sites and read hours and hours about patterns and inversed letters and all and I’m just going to share a little bit of the basics today.
I found there are two different ways to conduct book folding. The first one is simply with a chart that tells you where you have to measure with a ruler. I’m going to do it this way later on and is method 1.
The second method is actually putting a picture with lines under your page and fold to the tip and bottom of each line. See where I put the pencil marks on the book, you have to fold there.
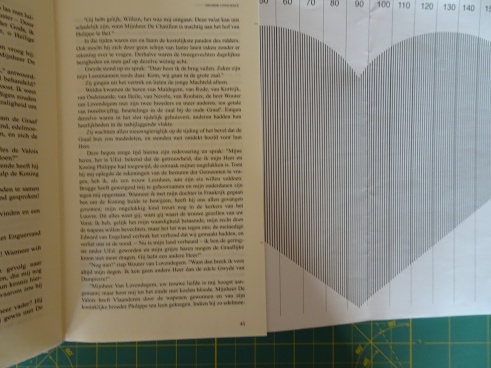
We’re not there yet though, I also found you can fold in two different ways as well. You can eather fold your page in a 45 degree angle (which I will be doing with the heart because it was shown like this in the instructable I followed), or you can create a notch (with a knife or some sharp object that creates an indent) at a similar distance on the top and bottom pages and fold towards that point. I think this will create an even neater and more even look.
Now let’s start !
What you will need:
- An old book – preferably a hard back because it stands better on its own. Most designs ask for books with 400-500 pages but this beginner’s design only has 40 folded pages so a thin book is fine in this case
- a ruler
- a pencil
- measurements (or a patterned design)
I agree, it’s not easy to ‘sacrifice’ a book but I had a very old copy of a novel (the Cal one) that was a mandatory read in school almost 20 years ago. I think it’s okay to let go now :-). The pages are all yellow as well so nobody would want to read it anyway.
![DSC00089[1]](https://thebelgianreviewer.files.wordpress.com/2017/07/dsc000891.jpg?w=484&h=363)
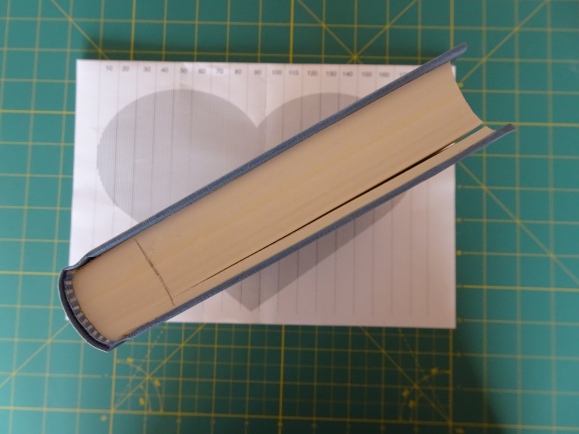
Turn the book so the left side is facing up:
![DSC00091[1]](https://thebelgianreviewer.files.wordpress.com/2017/07/dsc000911.jpg?w=521&h=391)
And then you make pencil markings, where you’ll have to fold. Now page 1 is not the first page of your book. You’ll have to calculate (or guess) where you’ll have to start so that it evens out on both sides a little. In this case it’s not hard because you know it’s 40 pages so count the middle of the book and 20 pages back.
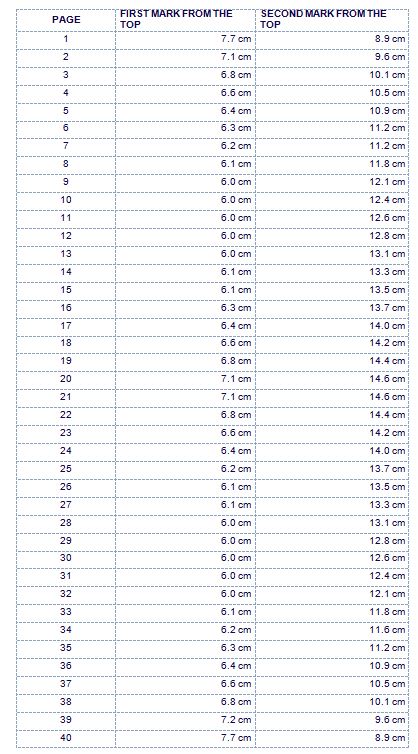
You can see here where I put the first marking (in centimeters as this is the metric system here) from the top and the second one (also from the top!). After marking you can fold both in as much of a straight line as possible, or you try the other method where you can fold towards the point where you made an indentation.
![DSC00093[1]](https://thebelgianreviewer.files.wordpress.com/2017/07/dsc000931.jpg?w=532&h=399)
This pattern is the easiest there is but Words are harder because some most letters like an R have interruptions and every time a letter crosses more sections on the same line it’ll need another fold on another page, so the page count for your folds increases fast this way.
If you have an inversed heart or other design it is done with little cuts in the paper’s edge and folding it back. I really like the way that looks as well. More for my to do list.
So you want to see the result? Here it is. Not too bad for a first try I think.

So when I finished this I wanted to do another one 😉 and this is how I did Home using the second method :


And the result:

So my experience so far:
- The heart one was quite fun and easy to do! No frustrations here !
- I guess you have to have a lot of patience if you do big designs but you can mark where you ended and restart another day easily
- One of the most difficult things is figuring out where you have to start in a novel with folding the pages. You’ll have to count out how much pages you need before you start and with a graphic design it’s not so easy. And then you have to figure out on what page to start the folding. It must be horror if you’ve been folding for hours and you run out of pages ;-).
- It’s not so easy to find (free) patterns. I found a lot about making your own designs with Photoshop and even in Word and tried some of it out but still didn’t manage to get an actual good design out of it.
- You can find quite a few patterns on Etsy but again, they are mostly for thick books (450-500 pages) and they have to have a certain height as well.
- There are plenty of youtube videos but the best tutorial, info and free templates (also the home one) I found on the site of Scrappy Sticky Icky Mess
- I also found a template for Read and Love on the above site but I’m still troubled with counting out how many pages I need. I think a lot of pages and I don’t have a book now so it’ll have to wait until I find an old novel nobody wants anymore 🙂


So what did you think? You like the results of book folding? Tempted to try it out yourself? Let me know!

Wow! That looks really great! So not for me. I have zero patience for stuff like this!
LikeLiked by 1 person
Thanks Dee! I’m actually a creative person so doing something to do with books is even more fun for me! I’m pretty impatient in every day life (I can’t even walk at a normal pace) but I am patient for other things, it depends 🙂
LikeLiked by 1 person
Looks incredibly intricate. Don’t think I’d have the patience either!
LikeLiked by 1 person
Thank you Cathy! It didn’t take that long ;-).. for the Home sign I did one letter each day so wasn’t more than half an hour to three quarters of an hour or so every evening 😉
LikeLike
Oh wow, they do look great. I don’t have any old books right now but its something I would like the try out. The heart one is my fave, beautiful!
LikeLiked by 1 person
Thank you Diana! I’m quite happy with my new home decoration too 🙂
LikeLike
Wow thy are amazing! I’d love to have a go and I know where to get some big books to use, but I’m not sure I have the patience to even start. I might ask my husband as he’s more artistic than me. 😉
LikeLiked by 1 person
Thank you Nicki :-).. you see your progress so that definitely helps and you have a first letter really quick, and you can put it aside and pick it up a week later without a problem so why not? I’m quite surprised there are so many impatient people here 🙂
LikeLike
That doesn’t sound too bad, maybe I could give it a try when I’m in a calm mood. 😊
LikeLiked by 1 person
It looks amazing and SO COOL. But I would never do that to my precious books ❤
LikeLiked by 1 person
I understand completely.. that’s why I chose a really old one and one I’d never read (even if it’s a famous classic). This way it lives on forever in my bookcase 🙂
LikeLiked by 1 person
This is something I have wanted to do for the longest time! I have been keeping an eye out for books in second hand shops but I keep thinking that when it comes down to it I will find it too overwhelming. Yours turned out beautifully 🙂
LikeLiked by 1 person
Really? I didn’t even know this existed until a few months ago.. and when I started googling I was very surprised to see how many designs there are. Finding a book is the hardest part, it’s not that hard to do ;-). Thank you so much lovely!
LikeLiked by 1 person
I was in a cafe a few years back and they had books hanging on a fishing line from the ceiling folded into the most beautiful shapes. Some had no back on them or if they did it was possibly paperback and folded also. Those were made to look, the closest I can think of is like a chinese lantern. They also had them done in other shapes and placed on shelves. It blew my mind!
LikeLiked by 1 person
Oh wow, that sounds amazing!
LikeLiked by 1 person
I will have to take pics if I go back and they have the same display 👍
LikeLike
This is amazing! Well done!
LikeLiked by 1 person
Thank you Chelsea !!
LikeLiked by 1 person
This is amazing!!! I would never be able to do something like this! My creativity is limited to digital things 😂
LikeLike
Thank you Lauren! It really isn’t that hard.. I think digital creativity is much harder, this is just euhm folding ;-). I wish I was better at what you do, so there 🙂
LikeLike
Oh my this looks awesome! I was like ‘OMG NO BOOK!’ and then I saw it’s an old one so I was like ‘Ok ok it’s fine’ 😀 I don’t think I’d have the patience for this though 😀
LikeLiked by 1 person
Thank you! I know it’s no fun that you have to sacrifice a book but these were ok. The heart one only took half an hour or so, that one didn’t take long at all 🙂 and I spread the other one over several days, doing one letter each day..
LikeLiked by 1 person
Wow! Wow! You must have so much patience….so impressive Inge. x
LikeLiked by 1 person
Thank you darling! I feel like I’m the only patient person in the world ;-). I was on such a high, I decided yesterday to start a 1000 piece puzzle… and no I’m definitely not a patient person ;-).
LikeLike
I wouldn’t be able to cope!!!!
LikeLiked by 1 person
I actually found a book that came pre-marked on Bookoutlet awhile ago and it was super easy! I am so nervous to try one on my own since I am not super creative but maybe on a slow day I will look into it more! Great job 🙂
LikeLiked by 1 person
Thank you Briana! It isn’t really all that hard.. if you start with the heart it’ll give you confidence to do other patterns after ;-). So cool that you had a pre-marked book!
LikeLiked by 1 person
This looks so good but I definitely would never have the patience!!!
LikeLike
This looks so beautiful! I’m not sure if I would have the patience, but I love the look of these.
LikeLiked by 1 person
Thank you love… there are plenty of other things I don’t have patience for but you see a result really fast here so that gave me the will to continue :-).
LikeLiked by 1 person
beautiful results but am I tempted to have a go? I dont have the patience needed so no…
LikeLiked by 1 person
I’m definitely not the most patient person though ;-). Thank you very much, I’m quite pleased with my first attempts as well.
LikeLike
wow, my mind is blown! This is such a cool post and I never knew I could do that… I have zero patience and generally bad at this ‘artsy’ stuff but I definitely want to have a go! It’ll take a week to find a book I’d be willing to sacrifice, but… this is cool! I’m redoing my living room so this looks like a ew piece I could decorate with! Thanks for sharing this!!! ❤
LikeLiked by 1 person
Thanks Liis. It doesn’t require much ‘creativity’, just following the instructions. A little patience is necessary but it’s not too bad, you see the progress so it’s cool :-).
LikeLiked by 1 person
Ooh they’re so pretty! I love both of them. I might have to give the heart one a go 🙂 Thank you for posting instructions! 🙂
LikeLiked by 1 person
Thank you Misti! I’d love to see your result! If you’ve got any questions when you start, don’t hesitate to contact me 😉
LikeLike
I’ll definitely keep you updated! Thank you, will do! ☺️
LikeLike
I haven’t done it yet, but I will definitely try 🙂 thanks for sharing.
LikeLiked by 1 person
You will? Cool! You’re very welcome :-). Happy book folding.. the folding isn’t the most fun part perhaps but you’ll be happy with the result, I’m sure of it!
LikeLike
Oh this is so cool! I’ve seen pictures of the end result, but never an actual tutorial. Maybe one day I’ll try this, it’s just that I have barely any patience so maybe this isn’t for me after all 😂
LikeLiked by 1 person
The little heart only takes half an hour so maybe you could start there if you really wanted to give it a try ;-). Thank you for stopping by !
LikeLiked by 1 person
Ohh that’s not too bad! I’ll save it for a rainy day 🙂
LikeLiked by 1 person
These look great! I have lots of admiration for your patience. How long did it take you?
LikeLiked by 1 person
Thank you! The heart one only half an hour.. The other one is hard to tell.. I did a letter each evening, it passed quickly really.. maybe 30-45 minutes for a letter? I lost a lot of time counting and then losing count where I was ;-).
LikeLiked by 1 person
Pingback: The Weekly Hufflepuff #53 | I Talk About Periods So… Sorry Not Sorry – The Writing Hufflepuff
That looks really good and you’ve got off to a good start – I hope you find some fat books to continue this unusual art form!
LikeLiked by 1 person
Oww thank you Cleo! I really liked doing this 🙂
LikeLiked by 1 person
These are all sooooo beautiful!! I just wish I had the art skill to do it all. :’)
LikeLiked by 1 person
Thanks love… they’re not so hard to make though, anyone can fold a page so give it a try, I’m sure you’ll like the result 🙂
LikeLiked by 1 person
It’s like origami with books! You got some really nice results for your first tries!! In all honesty, it still hurts a little to see books getting folded; yeh, I’m one of those people who’ll always struggle to fold a page in a book. Then again, a really old book, or even a really BAD book might do just the trick! Thanks for sharing, Inge! Really epic stuff! 😛
LikeLiked by 1 person
You just have to think it gives books an afterlife… I’m looking at this book folding art everyday now, when I’d never read the book (again) otherwise :-). Thanks so much!
LikeLiked by 1 person
These look amazing! I would love to have the read one on my desk at school! We’ll have to wait and see what happens 👍
LikeLike
Thank you, with your skills I’m sure you can make one too! I’d love to see it when the time comes 🙂
LikeLike
When I do I’ll link the post back to you 🙂
LikeLiked by 1 person
Cool! Thanks!
LikeLike
I looked all over the web for this tutorial and look where I ended up? Right here with you. Thank you!
LikeLiked by 1 person
Haha, yep it’s still one of my most popular posts. I really want to see what you made if you finished it, I hope you’ll share! Just to save you the trouble, I also did a post about making book flowers.
LikeLike
Fabulous post. I enjoyed this looking at these so much. I don’t think I could be so clever in book folding, but they are beautiful to look at.
LikeLiked by 1 person
Thank you so much for your lovely comment! There are so many amazing designs! Give these ones a try if you’re up to it, these really are doable 😉
LikeLike
Lovely page was so confused on how to read the patterns etc and no one wanted to explain your page has helped immensely ty
LikeLiked by 1 person
Thank you so much for letting me know Michele, I’m so happy my post was useful to you! Good luck with the book folding!
LikeLike
Holy smokes, this was so amazing. I loved it.
LikeLiked by 1 person
Thank you so much sweetie!!
LikeLike
These look great! I think I might give this a try one day. I love the way they look on a bookshelf!
LikeLiked by 1 person
Thank you Robin! I haven’t done any more bookfolding since but they’re both still decorating my shelves so I really do love looking at them! I hope you give it a try and enjoy it as much as I did!
LikeLiked by 1 person